How does it do it? It maps a domain name to the IP address of the server/s where the website is hosted. Once your phone has the right IP address, it can then access that website and the content therein. By default, your ISP automatically dictates which preferred and alternate DNS server you use. Most people don’t even think about it. We just expect our internet to work once we load some data. A web page you load will have its IP address along with some other content such as images, iframes and ads from other IP addresses. The bottom line is all this will work to slow down your browsing experience.
Android
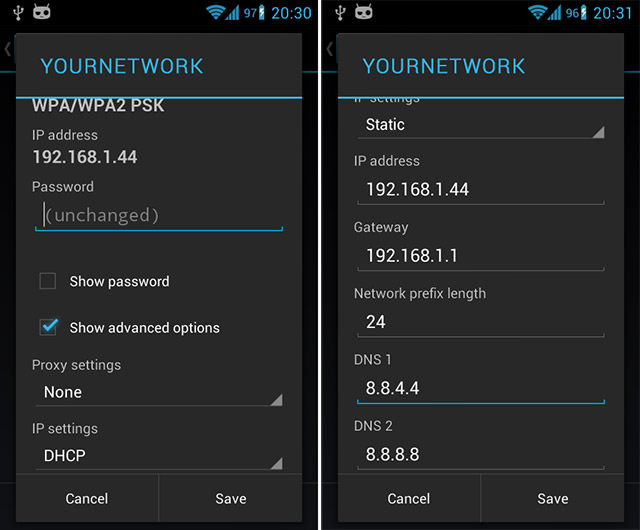
Android requires a static IP address to use custom DNS addresses, which takes additional setup steps. The router approach is recommended here. Setting IP Settings to “Static” will affect the way that DHCP does address allocation and can be used only as a short-term solution. In order to work correctly, you have to configure your router and assign static IP to the device’s MAC address. Changing the DNS settings will only affect your current Wi-Fi network connection. There is no option available to change the DNS settings for your 3G/4G data networks connection. Second, you must change the DNS server settings for each Wi-Fi network you want to connect to.
How to Change the DNS Settings on Android:
Open the Settings on the device. Select “Wi-Fi”. Long press your current network, then select “Modify network”. Mark “Show advanced options” check box. Change “IP settings” to “Static” Add the DNS servers IPs to the “DNS 1”, and “DNS 2” fields. Press “Save” button, disconnect from the network, and reconnect for changes to take effect.
Read About: How to change DNS server on your internet device
iOS
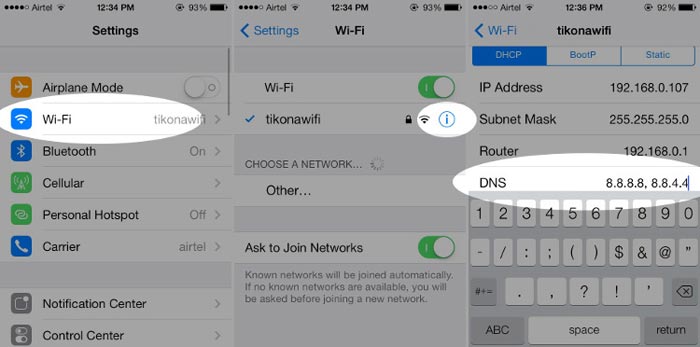
Your iPhone or iPad normally uses the DNS servers provided by whatever Wi-Fi network you use. But you can set a custom DNS server and use any other DNS server you prefer. Each Wi-FI network you connect to has its own separate DNS server setting. If you want to use your custom DNS server on several different Wi-Fi networks, you’ll have to change this setting once for each Wi-Fi network.
How to Change the DNS Settings on iPhone/iPad:
Open the Settings app Tap on Wi-Fi. If it’s switched off, turn it on. Pick a Wi-Fi network and tap on the blue “i” icon Tap on the text-field across the DNS label Enter the DNS addresses Tap on Wi-Fi on top to go back. The changes are saved automatically.
Which free DNS server can you use?
DNS servers will offer you faster internet access by reducing latency, better security through encrypted browsing history, and filter malicious/adult content.